Hi everybody :)
Coucou tout le monde :)
Here is my first article ! just for you !
Voilà pour vous mon premier article ! rien que pour vous !
(I made a tutorial a video tutorial)
(J'ai fais un tutoriel en vidéo)
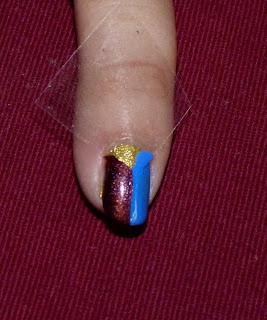
Here is the nail art.
It's a geometrical nail art with 3 colours (you can choose any colour you prefer).
Here a picked a gold nail polish, a brown/burgundy and a blue nail polish.
Voilà le nail art.
C'ezt un nail art géométrique avec 3 couleurs (vous pouvez choisir les couleurs que vous préférez)
Ici, j'ai pris un vernis or, a marron/bordeaux et un vernis bleu.
You will need / Vous aurez besoin :
- a basecoat / un vernis de base
- 3 different nail polishes / 3 vernis différents
- a top coat / un vernis de finition
- a pair of scissors / une paire de ciseau
- scotch tape / du ruban adhésif
First, apply a basecoat to protect your nails from pigments and prevent the nail polish from flaking.
D'abord, appliquez une base pour protéger vos ongles des pigments et pour empêcher le vernis de s'écailler.
D'abord, appliquez une base pour protéger vos ongles des pigments et pour empêcher le vernis de s'écailler.
Then apply a coat of a nail polish of your choice, here I chose a gold one.
Ensuite appliquez une couche du vernis de votre choix, ici j'ai choisi un vernis or.
Ensuite appliquez une couche du vernis de votre choix, ici j'ai choisi un vernis or.
Here is the longest step : wait for your nails to completely dry.
When your nail are completely dry, with the scissor, cut 5 pieces of scotch tape, they have to be squares.
Là viens l'étape la plus longue : attendez que votre vernis sèche complètement.
Une fois que vos ongles sont complètement secs, avec les ciseaux, coupez 5 morceaux de ruban adhésif, il faut qu'ils soient de forme carrée.
When it is done, take a square of scotch tape and place the corner in the middle of the nail
such as to form a triangle at the base of your nail.
Une fois que c'est fait, prenez un carré de scotch et placez le coin du carré au milieu de l'ongle de sorte ) former un triangle à la base de l'ongle.

Take the lighest colour (here a I picked a blue nail polish) of the two remaining ones
and apply one coat on one side of the nail.
The tip of the triangle should help you locate the middle of the nail. You will stop the first coat there.
Then take the remaining nail polish (here I chose a burgundy nail polish)
and apply a coat the same way you did previously but the other side.
When it is done, take off the scotch tape gently.
Prenez le vernis le plus clair (ici j'ai pris un vernis bleu) des deux qui restent et appliquez d'un côté de l'ongle.
La pointe du triangle devrait vous aider à repérer le milieu de l'ongle.
Vous ne mettrez du vernis que de ce côté.
Ensuite prenez le vernis qui reste (ici j'ai choisi un vernis bordeaux) et
appliquez une couche de la même manière que précédement mais de l'autre côté de l'ongle.
Quand c'est fait, retirez doucement le ruban adhésif.
For this step and the previous one, you should do one nail at a time,
because if you wait to long to take the scotch off, the polish will dry and it will ruin everything.
Pour cette étape ainsi que la précédente, vous devriez réaliser un ongle à la fois,
parce que si vous attendez trop longtemps pour retirer le ruban adhésif,
le vernis va sécher et ça va tout gâcher.

Finally, apply a topcoat and your done ;)
Enfin, appliquez une couche de vernis de finition, et vous avez terminé ;)


